Ozone injections after dental surgery were a key component of our healing. Sometimes, due to practical or financial constraints, it is not possible for a practitioner to do post-op ozone injections. After some trial and error, we learned to do our own post-op ozone injections at home. Several people have written in asking about the details of our equipment, setup and techniques. This article is a response to that request. As always, read the disclaimer below.
Articles complementary to this one include Cavitation Surgery, Root Canal Infection, and Hidden Dental Infections.
Here is a quick outline of this article:
Equipment
For injections, it became clear that I wanted as pure source of ozone/oxygen as possible. I didn’t want to inject nitrogen, carbon dioxide, or contaminants into my body. The O3 pure ozone generator that I use to wash my vegetables and generate water to swish-and-spit with after surgery wasn’t going to work. I needed a “medical grade” ozone setup. Many of the devices marketed as medical grade cost several thousand dollars, and some require a medical license. I wasn’t willing to invest that much money or time, so I was looking for a cheaper, easier solution.
Here is a list of the equipment I use for my at-home ozone injections. Most of the links are to Promolife, but there are probably lots of places where you can get these supplies:
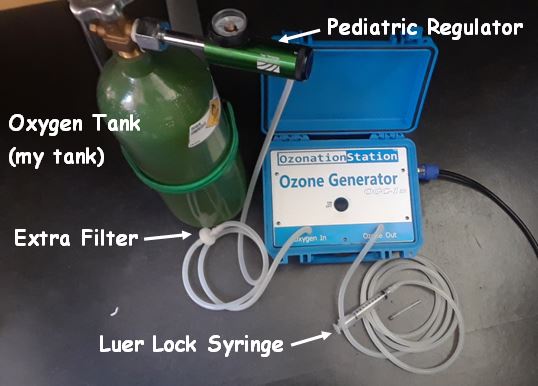
- Oxygen Tank (to feed the Ozone Generator)– A medical grade oxygen tank requires a physician prescription. Some oral surgeons or dentists may be willing to write a prescription. Although my oral surgeon was willing to give me a prescription, I wasn’t motivated to go through the hassle. I realized that the difference between medical grade oxygen and welding oxygen is the tank [1]. If the oxygen tank is left open or rusted, contaminants can enter the gas output. So, I instead bought a brand new tank from the local welding supply shop and had them fill it with welding-grade oxygen. When I need it refilled, I insist that they use my tank and instead of swapping it with another tank.
- Pediatric Oxygen Regulator– The regulator controls how much oxygen goes into the ozone generator. This ultimately controls the concentration of ozone at the output.
- Ozone Generator – The OzonationStation was marketed as having medical-grade components when I purchased it from Ebay. Then it was being marketed as Lab-grade components on Amazon. Personally, I have been quite happy with this machine. It is economical, and the ozone injections made from it perform well clinically and in muscle testing. Unfortunately, it is no longer available for purchase. If I were to buy one today, I would probably buy one from Promolife.
- Extra Filter – I added an extra oxygen line filter on the tubing going to the Ozone Generator. It’s probably not necessary, but I figured it can’t hurt.
- Check Valve – For the cost of the ozone generator, I figured I may as well spend another $7 and add a check valve. This will protect the generator from any liquid backflow if one decides to make ozonated olive oil or water. (I made ozonated olive oil and water with this medical-grade setup, and found it tested no differently than the ozonated liquids I made with my O3 Pure fruit and vegetable washer.)
- Hypodermic Needles – I like the Nipro 27G x 1.25” and the Nipro 30G x 0.5”. It really depends how thick you like your needles, and where the surgery site is located. If it’s a wisdom tooth socket in the back, I would go for the 1.25” needles. If it’s a front tooth, then the 0.5” needles. Make sure the needles have the Luer Lock to fit on the Syringes.
- Luer Lock Syringes – Any syringes will do. Just make sure they have the same locking system as the needles. (I chose Luer Lock)
- Hosing – Silicone hosing connects all the pieces together.
- Extra Luer Lock Fittings (optional) – These fittings are super handy to have around, so I recommend grabbing some extra if you’re ordering supplies anyway.
The connection of the equipment is best described with a picture:

Note that I bungee-corded the oxygen tank to the leg of the desk for safety reasons.
What Concentration of Ozone?
I have surveyed two practitioners on the topic of what concentration of ozone is best for injections. One says 28 gamma (gamma is units of ug/mL), the other says 25 gamma.
For the ozone generator above, it says 65 gamma (ug/mL) is 1/32LPM (Liters per Minute) of oxygen in. This means that if the pediatric oxygen regulator is set at 1/32, one would expect to get gas out with 65 gamma of ozone. This is the only data point given. Scrounging together some tables from other manufacturers, I estimate a 1/4 setting is about 18 gamma and 1/8 setting is about 33 gamma. I’ve tried both of these settings, and haven’t seen much difference clinically in the injections.
Drawing the Injection
Here’s how I fill the Luer lock syringe with ozone gas:
- Turn the pediatric regulator to 1/4 or 1/8.
- Turn on the oxygen tank.
- Turn on the OzonationStation.
- Wait until I smell ozone coming out of the “Ozone Out” tube. Typically this takes a few seconds.
- Connect the Luer lock syringe to the Ozone Out tubing.
- Let the pressure of the ozone gas coming out fill the syringe. I fill the syringe to 10mL, even if I don’t end up using it all.
- Take syringe off of the output tubing and attach the Luer Lock needle.
- Turn everything off – the OzonationStation, the Oxygen tank, and set the pediatric regulator to zero.
- Turn the syringe with the needle upside down. I push out about 2 mL of gas, just to be sure that any ambient air in the needle when I attached it is pushed out.
Injecting the Ozone
I recommend doing the first ozone injection with a practitioner. This is so one knows what to expect and how it feels. I found this gave me a lot more confidence doing future injections at home.
Typically I like to inject at least 2-3cc. Occasionally I will inject more or less, depending on the location, how deep the surgery was, etc. What I learned to avoid was injecting too much or in the wrong location. Filling your cheek or throat full of ozone is no fun!
First, position the needle directly in the middle of the surgery site. This is easy if the surgery site is in the front of the mouth. If it’s in the back of the mouth, I often will feel with my finger to the location. Then I guide the needle along my finger to the correct location.
I found the needle goes in easier if it’s at a similar angle at which the surgery was performed. Easier said than done, I know!
When pushing the ozone in, I like to go slowly. If I start to feel back-pressure during the injection, I stop and wait, either with the needle in or taken out. I also want to feel the ozone bubbling in the right direction – up in the case of an upper tooth and down in the case of a lower tooth. If I start feeling the ozone going into my cheek, I stop and try again at a different angle.
References
[1] “Is medical O2 different than the other O2 sources?”
FAQ
Q: How much does this cost?
A: Total, my setup cost around $600. If you calculate out that some practitioners charge $150/injection, that’s about 4 injections to break even.
Q: What about drilling a tap for an injection? Do you do that at home too?
A: No. I’ve only ever done ozone injections at home on myself after surgery.
Q: Was there a point in time when you felt comfortable and confident in stopping the ozone injections? If so, when? How did you know?
A: I use a combination of symptoms and muscle testing to determine when ozone injections are no longer needed. To give you a general idea of what is needed after cavitation surgery, check out the Cavitation Surgery Post Op discussion.
Was this information useful? If so, please consider donating to keep this site alive.
Last Updated:


I just watched your video on YouTube. I’ve had chronic health conditions for years. I just found out a couple months ago that I have cavitations and all four wisdom teeth extraction sites. I just bought an O-Zone generator two weeks ago from Prohome all live PR 0MOLIFE. You have me very intrigued about doing my own injections. Do you know anybody who has done injections before they have had cavitation repair? I plan on getting the repair work and I’m looking at scheduling it for January, but I’m wondering if it can be helpful even as a temporary stopgap?
Thanks for the great video! As a practitioner of manual therapy for 25 years I appreciate your recommendations for cranial manipulation pre-and post!
From this side of things it’s hard for me to imagine being able to open my mouth wide enough to get the right angle of the needle into the injection site… I keep thinking the needle should be bent at a rate angle right angle… But obviously you figured it out so it’s possible. I have a further complication of being quadriplegic so I would have to coach a friend or caregiver to do the injection for me! 🙂 Of course I’m crazy enough to give that a try. 🙂
Thank you for your wonderful website! I just found it a few minutes ago and haven’t had the chance to dive in…
Michael Mathieu
Boulder Colorado
My opinions on pre-surgery ozone injections can be found here:
http://fbd.dfq.mybluehost.me/dental-cavitation-root-canal-infection-dental-implant-infection/#Treatment-for-Dental-Infections
Best wishes in your healing journey.
Thank you Susan for all the info you have shared – very helpful in getting ready for cavitation surgery. I am wondering if food grade hyd. peroxide would work for post-surgery injections, in place of ozone. Kelly
I don’t recommend hydrogen peroxide because it destroys bone and soft tissue.
I’m curious if you have used your home ozone generator on other members of your family and if you still recommend the Promolife system. It seems as though there are a few different companies that appear to offer pretty comparable systems. Dave Asprey promotes the Simplyo3 product line, but I don’t know enough to be able evaluate one system over the other. I’ve had effective ozone treatments at my doctor’s clinic, but it’s just not financially feasible or logistically possible to receive multiple treatments a week like I could with a home system. I have learned so much from every section of your website. Thank you for sharing all that you have learned through your healing journey.
Yes and yes. I can’t comment on any other system besides Promolife. I know Promolife works and doesn’t have any toxins that effect the ozone.