Dental Frenectomy – Tips, Lessons Learned, & Unbelievable Results
Dental frenectomy has been a huge step forward for our health. Our physical structure, posture, moods, and ability to detoxify(!!) have significantly improved. Our family of four has had a total of 7 lingual frenectomies, 3 labial frenectomies, and 3 labial ‘buckle’ frenectomies. These frenectomies were performed on us as adults and children. This content summarizes our lessons learned, tips, and results from these dental frenectomies.
How We Ended Up Getting Dental Frenectomies as Adults & Children
When to Get a Lingual Frenectomy
When to Get a Labial Frenectomy
Lingual & Labial Frenectomy Tips
- Frenectomy Practitioner Team
- Labial Frenectomy Pre-op Exercises
- Lingual Frenectomy Pre-op Exercises
- Frenectomy Procedure
- Labial Frenectomy Post-op Exercises
- Lingual Frenectomy Post-op Exercises
Amazing Imrovements After Dental Frenectomy
Frenectomy Procedure Pictures – Warning: Graphic Content
Post Frenectomy Pictures – Warning: Graphic Content
How We Ended Up Getting Dental Frenectomies
I never knew we needed tongue tie corrections, a.k.a frenectomies, until an oral myofunctional therapist mentioned that we might feel better. Oral myofunctional therapist, what’s that?!? Well.. A dentist said that if we got our oldest daughter holding her tongue in the right position and swallowing correctly, she might not need any orthodontics. I quickly did the numbers. Myofunctional therapy is way cheaper than orthodontics, so why not consider it?
Surgery so that you ‘might feel better’ seemed a little questionable. The myofunctional therapist said that our daughter was breathing through her mouth. A labial frenectomy to cut the skin holding her lip too high might help. With this skin gone, the lip can drop down further, making it easier to keep the mouth closed. The frenulum under the tongue didn’t look too bad. The following picture shows how wide she can open her mouth while her tongue is suctioned to the roof of the mouth. Pretty wide. However, while she was numb anyway for the labial, we decided to take care of the small lingual frenectomy as well.
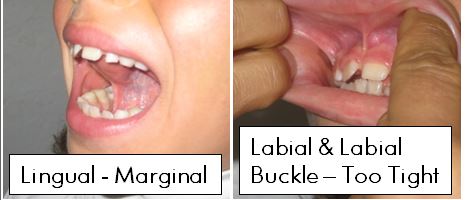
Our youngest, however, had a minor speech slur and sometimes was difficult to understand. I had always rationalized that her speech issues were because she spoke 3 languages at the age of 4, and that confused her speech. On the other hand, I could see with my own eyes how tight the frenulum looked. The sides of the upper lip, a.k.a. labial buckles, also looked really tight. This child needed all three – lingual frenectomy, labial frenectomy and labial ‘buckle’ frenectomies (ie upper lip on both sides):
We got second and third opinions from osteopaths who are familiar with dental frenectomy. They agreed that they thought these tight flaps of skin might be holding back the development of our youngest child especially. Noone promised anything, but they all said that we would probably see some sort of improvement from dental frenectomies.
While I was at the oral myofunctional therapist, I decided to have her check me out as well. I had already taken care of the labial frenulum in a car accident as a child. My labial buckles were pretty much non-existent. However, under my tongue was really tight:
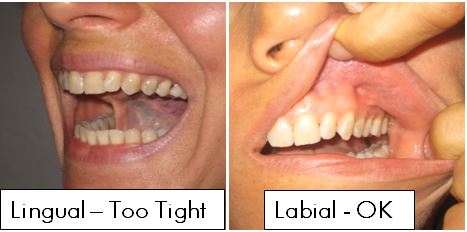
What about my husband? Well, remarkably he didn’t need lingual or labial frenectomies. We asked multiple osteopaths and dentists for opinions. Interestingly, he is the best detoxer in the family and also has great physical posture. I also observe in his mouth that there is nothing to cut labially. Lingually, he has a bit of a frenulum. However, look at how widely he can open his mouth with his tongue suctioned up:
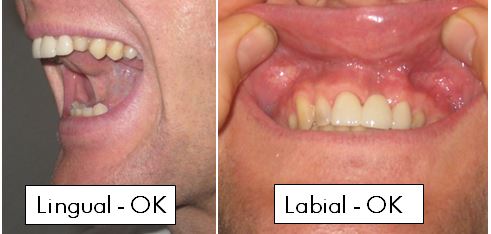
All three of us ladies decided to all get some kind of dental frenectomy. Initially, I got a lingual frenectomy only. The children initially got 4 cuts total – 1 lingual frenectomy, 1 labial and 2 labial buckle frenectomies. This was performed by a dentist who uses a laser and local anesthetic. We did not do it with an oral surgeon. More details about why are below in Lingual & Labial Frenectomy Tips.
As a preventative to infection, we swished with ozonated water before, during and after the procedure. The ozone water we made ourselves with this ozonator. We continued to swish daily until about a week after the procedure. We also did exercises to prepare for the frenectomies, and exercises after the frenectomies to make sure they didn’t re-attach. More details about the exercises are below in Lingual & Labial Frenectomy Tips.
It is apparently relatively common for multiple dental frenectomy ‘revisions’ when using a laser [1]. A revision means that they go back and do it again. Our dentist estimated that 30-60% of the frenulum re-attaches after laser lingual frenectomy. Sure enough, we got such benefits from the first round of frenectomies that we went back for more. My sense overall is that we got the most benefit from the first round of cuts. However, I’m still glad we did the revisions. Here is a table summarizing our frenectomies:
| Age of Person at time of Frenectomies | Number of Lingual Frenectomies | Number of Labial Frenectomies | Number of Labial Buckle Frenectomies |
| 4, 5, 6 (Youngest Child) | 3 | 2 | 2 on both left and right sides |
| 7, 8 (Oldest Child) | 1 | 1 | 1 on both left and right sides |
| 38, 40, 41 (Me) | 3 | 0 (car accident as child took care of labial frenum) | 0 |
| 44 (Husband) | 0 | 0 | 0 |
When to Get a Lingual Frenectomy
There are no hard and fast rules defining when a lingual frenectomy is needed. So how does one know? First I would consider the following clues. Then I would research the best oral myofunctional therapist and osteopaths in town. If their opinions are neutral or positive, then I would consult a dentist who uses a laser to perform the lingual frenectomy. Ok, on to the clues that a lingual frenectomy might be needed:
- Slurred Speech or Trouble Eating – This is the obvious one that most people associate with lingual frenectomies. However, it is only one clue. People without slurred speech or trouble eating may still benefit from lingual frenectomy.
- Does it Visually Look Tight – Suction the tongue up to the roof of the mouth. Then keep the tongue suctioned there and open the mouth as wide as possible. Below are some example pictures:
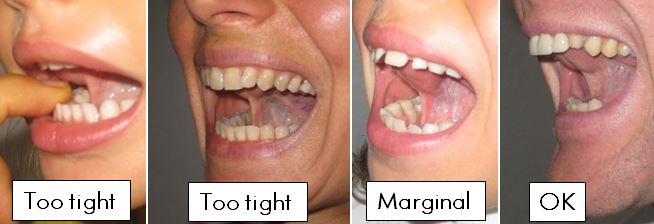
- Tongue Resting Position on the Bottom Instead of the Top – If the tongue is held too tightly, it will rest on the bottom of the mouth instead of the top. Remember, this is a clue, not a hard-and-fast rule. Exercises can also be done to get the tongue resting on the roof of the mouth.
- Teeth Pointing Inwards – This is a sign that the tongue is resting on the bottom of the mouth instead of the top of the mouth. Proper development of the upper mandible and palate has the teeth pointing slightly outwards. The tongue resting in the proper position pushes the teeth slightly outwards.
- MTHFR Mutations – Again, this is not a for-sure indicator. Science is just learning about the connection between MTHFR mutations and frenectomies [2]. For our family, people with C677T mutations had the most need for frenectomy. Conversely, I would check methylation if a frenectomy is needed. The MTHFR treatment section has more details.
- Fascial or Mandible Underdevelopment in a Child – Visually observe if the mouth or jaw area looks underdeveloped. Underdevelopment may be because the frenulum is holding back growth. Examples of proper development can be found in pictures mid-way down in the article: “Ancient Dietary Wisdom for Tomorrow’s Children.” Notice the spacing between the teeth, wide palate, and development of the jawbone.
- Children That Need Orthodontics – In a seven year follow up case study, Defabianis [3] indicated that after a lingual frenectomy there was a spontaneous expansion of the child’s palate which negated the need for orthodontic treatment. If a child needs orthodontics, I would also consider the possibility of a frenectomy.
- Hunchback Posture – Hunchback posture typically means an airway issue which sometimes points back to the tongue not being on the roof of the mouth. Lingual frenectomy can help get the tongue on the roof of the mouth.
When to Get a Labial Frenectomy
There are no hard and fast rules defining when a labial frenectomy or labial buckle frenectomy is needed. First I would consider the following clues. Then I would research the best oral myofunctional therapist and osteopaths in town. If their opinions are neutral or positive, then I would consult a dentist who uses a laser to perform labial frenectomies. Ok, on to the clues that a lingual frenectomy might be needed:
- Mouth Breather – Sometimes mouth breathing is caused by the lip being held up too high by the skin. This could be in the center (labial) or on the sides (labial buckle).
- Does it Visually Look Tight – Lift the upper lip and visually inspect if the frenulum looks tight. Generally tight means the skin attaches between the teeth or very close to the teeth. Tight can also mean that the skin looks like it is holding the lip too high. Below are some example pictures, both for the labial frenulum in front and on the sides (aka ‘buckle):
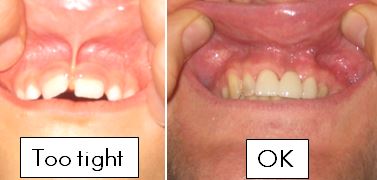

- Hunchback Posture – Hunchback posture often indicates an airway issue and a mouth breather. The mouth breathing could be caused by the upper lip being held too high. The labial frenum in front or on the side could be holding the lip too high.
- MTHFR Mutations – Again, this is not a for-sure indicator. Science is just learning about the connection between MTHFR mutations and frenectomies [2]. For our family, people with C677T mutations had the most need for frenectomy.
- Doing a Lingual Frenectomy – If a lingual frenectomy is being performed, I would consider doing the labial or labial buckle at the same time. (I’m all about efficiency and minimizing days off work!) Even if the labial cases are marginal, I would consider having them done at the same time as the lingual.
Lingual & Labial Frenectomy Tips
Seven lingual frenectomies, three labial frenectomies, and three labial buckle frenectomies == A lot of lessons learned, tips, and tricks to share! Frenectomies are not pleasant, and there is ‘homework’ to be done in order to maximize results. Let’s get on with it!
Frenectomy Practitioner Team
The most important part of a frenectomy is having an awesome practitioner team. Note that Dr. Lopez’s article “Adult Frenectomy For Pain Relief: Osteopathic Considerations” indicates that he has the same 3 practitioners that I recommend on his team [3].
- Dentist With Laser – There are two options for the surgeon – a dentist with a laser or an oral surgeon. I recommend choosing the former. The oral surgeon can cut further and into blood vessels. They use stitches to control bleeding. I have heard of several negative outcomes from oral surgeons. Let’s face it- the tongue is essential and even biting the tongue is painful. My theory is that if too much is cut at once, the body might not be ready to heal from such trauma. Furthermore, the surgeon can keep cutting beyond blood vessels because stitches will close the wound.
Our strategy was to do lots of pre-op exercises to thin the frenulum and prepare it for surgery. The dentist only cuts with the laser up to the first blood vessel. There are no stitches involved. This means that 30-60% of the frenulum will re-attach. Post-op exercises are essential to keeping this number closer to the 30% range. Using the dentist, ‘revisions’ are sometimes necessary [3]. This means again pre- and post- op exercises. Personally, I would rather take this option than risk a negative outcome. Dr. Lopez claims that using a laser means “faster healing time, no stitches, and less pain after the procedure [3].” I can’t confirm or deny the faster healing time and less pain claims.
When searching for a practitioner, look for someone who is experienced with frenectomies. Someone who does them every day. Ask for recommendations from the Oral Myofunctional Therapist (OMT). Double check the practitioner on Yelp. - Oral Myofascial / Myofunctional Therapist (OMT) – OMTs can help prepare and recover from surgery. They can also help diagnose the need for a frenectomy. They help with things like pre- and post-op oral exercises, reflex and release points, and oral/postural/breathing behavior modifications.
I highly recommend having a good OMT on the team. Ask Dentists and Osteopaths for recommendations. Check Yelp. Some of them will even do Skype appointments. Our PPO insurance does partially reimburse for OMT appointments. If there no good OMT in the area, pay extra attention to the tips for pre- and post-operation exercises in the next sections. - Osteopath – Osteopathic treatments before and after frenectomies are recommended. You need a really good one – A traditional DO who actually practices body work, instead of one who has transitioned to more of an internal medicine role. Again, check with dentists, OMTs and Yelp to find recommendations.
Sometimes an osteopath can also help diagnose the need for a frenectomy. Frenectomies are painful, traumatic surgeries. Osteopaths can make sure the body is in tip-top shape before the procedure. Their treatments may also help ensure that the cranial bones shift on their own after the frenectomy.
After dental frenectomies, osteopathic treatment is really essential. A laundry list for osteopaths post-frenectomy is: check the cranials to make sure they are moving, check the mandible and jaw area, and work on the hyoid bone.
Labial Pre-op Exercises
Exercises before and after a dental frenectomy are very important to a successful outcome. Exercises help thin out the skin, increase range of motion, push back nerves and push back blood vessels. The upshot of exercises is that hopefully more can be cut at a time, and the chance of amazing outcomes like ours increases. Start these at least a month before surgery. Video demonstrations of the exercises follow the table.
The ideal situation is to work with an OMT on your individual case. However, if no OMT is available, or if you want some new ideas for exercises, or you just want to compare, then hopefully these will help.
| Exercise Name | Frequency | Description |
| Tongue Around the World | Do 10 in each direction 2x/day | Move the tongue in a circle along the teeth. As if you are trying to clean the teeth with your tongue. Keep the lips closed. Don’t move the jaw. |
| Puffs | Go around 2 times in one direction, then 2 times in the other direction, 2x/day | Keeping the lips closed, blow air up, right, down and left. This is one time around. |
| Lip Pops | Do 10 loud ones, 2x/day | Suck the lips in over the teeth. Press lips together and pop. |
| Lip Around the World | 10 circles to the front and sides, 2x/day | Grab the upper lip with the thumb and forefingers of both hands. Move the lip around in a circle. Go to the right and left sides (close to the labial buckle) and repeat. |
The following video demonstrates these exercises.
Lingual Pre-op Exercises
Exercises before and after a lingual dental frenectomy are also very important to a successful outcome. Exercises help thin out the frenulum, increase range of motion, push back nerves and push back blood vessels. The upshot of exercises is that hopefully more can be cut at a time, and the chance of amazing outcomes like ours increases. Start these at least a month before surgery. Video demonstrations of the exercises follow the table.
The ideal situation is to work with an OMT on your individual case. However, if no OMT is available, or if you want some new ideas for exercises, or you just want to compare, then hopefully these will help.
| Exercise Name | Frequency | Description |
| Tongue Around the World | Do 10 in each direction 2x/day | Move the tongue in a circle along the teeth. As if you are trying to clean the teeth with your tongue. Keep the lips closed. Don’t move the jaw. |
| Lip Lickers | Do 10 in each direction 2x/day | Lick the tongue around the lips, as if you are trying to lick something sticky off the very edge of your lips. |
| Tip Pops | 30 loud ones 2x/day | Suction the tongue to the roof of the mouth. Smile, then pop the tongue down. Try to avoid allowing the tongue to actually hit the floor of the mouth. The jaw should not move. |
| Peanut Butter Scrapes | Do 10 2x/day | Open the mouth wide. Put the tip of the tongue on The Spot. Scrape the tongue backwards towards the throat. Keep the mouth as wide open as possible. It’s as if you’re trying to scrape peanut butter off the to of your mouth. |
| Tongue Drags | Do 10 2x/day | Same as the above peanut butter scrapes, but with the tongue suctioned to the roof of the mouth. |
| Frenum Massage | Do 10 in the middle and on each side, 2x/day | Suction the tongue to the roof of the mouth. Open as wide as possible. Then with two fingers, rub the frenulum on both sides together from bottom to top. Try to rub as far back as possible. After 10 of those, massage 10 times on each side with one finger. |
| Tongue Push Ups | Hold for 3 seconds, 15 2x/day | Hold the lower jaw in place with one hand. Do not let it come forward. Open the mouth and extend the tongue out to a tongue depressor. Push the tongue against the tongue depressor as hard as possible with the tip of the tongue up. Hold for 3 seconds. Remember to keep the lower jaw back. |
The following video demonstrates these exercises.
Frenectomy Procedure
The frenectomy procedure itself is not fun, but for us the results were well worth it. Here are some tips for the actual dental frenectomy procedure.
- Anesthesia – Dentists may offer the option of local or general anesthesia. I vote local. It is easier to recover from local than general. Local is less risky than general. The pain starts after anesthesia wears off, so the pain is coming anyway. The only downer to being awake during the procedure is the smell. The smell of burning flesh is never pleasant!
- Lingual, Labial or Both At Once? – While one is taking time off work and school, get them all done at once. One anesthesia, one recovery.
- Prevent Infection – Take an ozonator to the procedure. Swish and spit with ozone water before and after the procedure. This is to help prevent infection. Some say swish with salt water or hydrogen peroxide. I like ozone because it kills everything. Continue the ozone water swish and spit twice a day for 3-4 days after the dental frenectomy.
- Time Off – Taking time off is a tough one for me. Frenectomy is a major trauma, even in adults and children. We typically had our procedures done first thing in the morning. We took the rest of the day off, and took naps in the afternoon. Kids went back to school on the following day. It is very painful, so school helped distract them from the pain. Adults took a second day off.
- Pain – Yes, it hurts a lot. The pain makes one not want to move the tongue. The less the tongue is moved, the more of the frenulum will re-attach. So get on those exercises, talking and moving the tongue! Our pain typically lasted about 3-4 days.
- Exercises Immediately After Frenectomy – Our OMT wants a Skype appointment immediately after we get home from a frenectomy. She makes us start the exercises immediately – before the anesthesia wears off. This is essential to making sure the frenulum doesn’t re-attach. We continue the exercises 2-3 more times on the surgery day. The following days we do them in the morning and evening, for the next 14 days.
- Eating After Frenectomy – We didn’t feel like eating much after frenectomy. The taste of burning flesh is enough to turn anyone’s stomach. We did prepare some cold foods for post-op: fermented coconut milk yogurt (no sugar), and some coconut milk ice cream (no additional sugar). Soft foods were best for the first 3-4 days after dental frenectomy.
- Steroid Cream – On our third lingual frenectomy revision, our OMT suggested an oral steroid cream applied directly to the wound to help it heal faster. The faster the wound heals as-is, the less re-attaches. Does it work? Yes, but not in the way I imagined. It turns out that the post-op pain is significantly lower with the steroid cream. Awesome! This allowed us to move the tongue more often and stretch it further after surgery. Previously we didn’t want to eat or talk after surgery. With the steroid cream, we were eating and talking normally! This increased mobility, I think, meant that we didn’t have as much of the frenulum re-attaching. The cream is called Triamincinolone Acetonide Dental Paste USP, 0.1%. We applied a small ball of this dental paste once a day directly on the surgery site. We were careful not to rub the scabbing off.
- Post Op Supports – We tested many homeopathics, vitamins, and herbs post-op to see what would help the most. Here’s what we found:
- Drainage Remedies – We all needed new drainage remedies following our frenectomies. These open the pathways for toxins to be excreted. We want to make sure the numbing medications and any infectious bacteria are quickly drained away by the body. The exact drainage remedies needed really varied by person. Every time we had to go through the whole box of remedies. If I were forced to pick out the most useful, then I would pick Vascular Terrain, Blood Terrain, Kidney Terrain, Colon Terrain, Gallbladder Terrain, Core Echina-B and Bacterotox.
- Pain – The homeopathic remedy Arnica hands-down tested the best on us. Immediately after the surgery, Rescue Remedy was also testing very well on the children.
- Healing – Vitamin E tested the best in this category, with coconut oil coming in second.
- Skin Brushing – Adults were testing well on skin brushing after surgery. I felt much better after skin brushing. The children weren’t testing as well on the skin brush, and they didn’t report noticing a difference.
Labial Frenectomy Post-op Exercises
About 30-60% of the skin that was cut with a laser will re-attach. Exercises and movement after surgery are essential to making sure the re-attachment is closer to the 30% range. Yes, this will be excruciatingly painful, but yes, it is excruciatingly necessary. Some of the exercises are the same as the pre-op exercises.
| Exercise Name | Frequency | Description |
| Tongue Around the World | Do 10 in each direction 2x/day | Move the tongue in a circle along the teeth. As if you are trying to clean the teeth with your tongue. Keep the lips closed. Don’t move the jaw. |
| Puffs | 2 times in each direction, 2x/day | Keeping the lips closed, blow air up, right, down and left. This is one time around. |
| Lip Around the World | 10 circles to the front and sides, 2x/day | Grab the upper lip with the thumb and forefingers of both hands. Move the lip around in a circle. Go to the right and left sides (close to the labial buckle) and repeat. |
| Cotton Roll Holds | Hold the cotton roll in as long as possible 2x/day. | Put a clean cotton roll under the lip at the surgery site. Close the lip and hang out in that position. |
| Cork Pulls | Do 10 2x/day. | This is one to start a few days after surgery. Suction the cork into the mouth. Then pull it out, making a popping noise. |
| Great Granny Surprise Face | Do 10 2x/day. | Roll the lips in over the teeth and open the mouth. Lift the eyebrows as if you are surprised. |
The following video demonstrates these exercises.
Although this is not my video, this is an excellent one done by a dentist. He very clearly demonstrates some of the exercises.
Lingual Frenectomy Post-op Exercises
About 30-60% of the skin that was cut with a laser will re-attach. Exercises and movement after surgery are essential to making sure the re-attachment is closer to the 30% range. Yes, this will be excruciatingly painful, but yes, it is excruciatingly necessary.
Start post-op exercises with the same pre-op exercises. Do these for the first week. After the first week, start on the new exercises in the table below. The one exception is Gelatin on The Spot. Gelatin should be started immediately.
| Exercise Name | Frequency | Description |
| Gelatin on The Spot! | 2-3x/day | Now is the perfect time to retrain the tongue to be on the roof of the mouth! Put sticky gelatin or strip paste on The Spot. The tongue will try to play with it or get it to come off, spending more time in the correct position on The Spot. |
| Jaw Breaker | 10 2x/day | Push the tongue into the side of the cheek. As if you have a big jaw breaker in your cheek. |
| Caves | 10 2x/day | Suction the tongue to the roof of the mouth. Open the mouth as wide as possible. Ouch, I know. Now hold for 10 seconds. |
| Pencil Pull | 5 over, 5 under 2x/day | Sick the tongue out and roll it over a pencil. Then retract the tongue and roll it under a pencil. Can also use a chop stick. |
| Tongue Depressor Push-Up | Count to 5 on all 5 sides 2x/day | Push the tongue against a popsicle stick. Left, right, up, down, and out. |
| Pet The Dog | Do 10 2x/day | Rub the surgery site from the bottom to the top. Definitely don’t start this one until 7 days post-op. |
| Gentle Tongue Pull with Gauze | 2 2x/day | Gently grab the tongue with gauze. Gently pull out. Then gently twist to each side. |
| Waggle-Waggle Spot | 10 2x/day | Extend the tongue as far as possible from one corner of the mouth to the other corner. Do this 5 times and then touch the tongue to The Spot. The next time, touch the upper or lower lip at the end. |
| Lizard | 10 2x/day | Extend the tongue as far as possible, holding for 10 seconds. The tongue should feel long and skinny like a lizard’s tongue. Then touch the tongue to The Spot. |
The following video demonstrates these exercises.
Amazing Improvements After Frenectomy
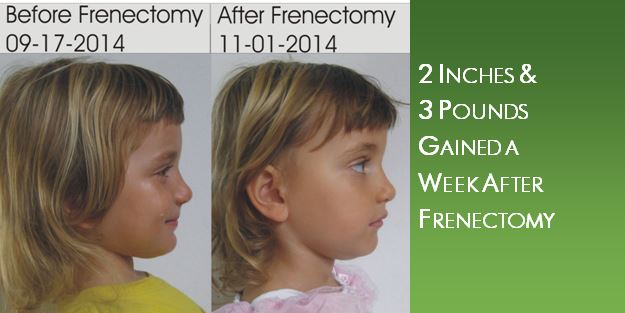
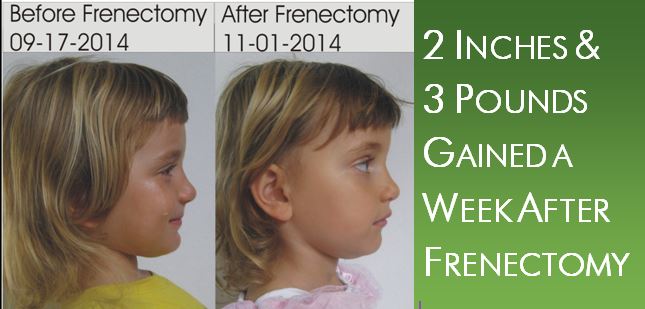
WOW were we rewarded! Our youngest child grew 2 inches and gained 3 lbs in the week after her first lingual, labial, and labial buckle frenectomy procedure. Her face clearly developed in a matter of weeks:
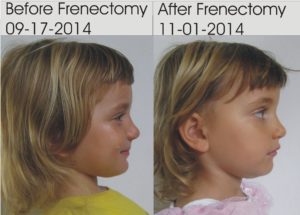
After the amazing results with her, we decided to consider frenectomies on the rest of the family as part of MTHFR treatment. It turns out my husband didn’t need a frenectomy, only the oldest daughter and I did. To figure this out, we consulted dentists, osteopaths, and the oral myofunctional therapist.
In my case, my amazing improvement was that my hunch back became less pronounced. It was easier for me to maintain proper posture throughout the day, and in pictures I was no longer hunched over. I noticed my tongue finally settle into the proper resting and swallowing position on the roof of my mouth. The residual ringing in my left ear shifted to become less intense. Although the rest of our results weren’t as dramatic, they were still significant and we are glad we did the frenulum work. Here is a summary of our conventional MTHFR mutations, frenectomies, and improvements:
| Age of Person | MTHFR Mutation (s) | Number & Type of frenectomy | Slurred Speech | Development of Jaw/Face | Growth Spurt | Hunch-Back Posture | Overall Good Mood & Happiness |
| 4-5 (Youngest Child) | C677T / C677T | 3 Lingual, 2 Labial, 2 Labial Buckle | ++ | +++ | +++ | +++ | |
| 7-8 (Oldest Child) | C677T / A1298C | 1 Lingual, 1 Labial, 1 Labial Buckle | ++ | + | |||
| 38-40
(Me) | C677T | 3 Lingual, Labial done in car accident as child | +++ | + | |||
| 41-43 (Husband) | C677T / A1298C | Didn’t need any |
+ = slight improvement
++ = major improvement
+++ = unbelievable improvement
The youngest child and I had the worst tongue ties in the family, and we both have C677T mutations only. We also both saw the most benefit from frenectomies. This is not enough data for a conclusion, but interesting to note. Hopefully this table helps quantify the benefits of considering frenectomy as part of an MTHFR treatment strategy.
We were amazed by all the improvements we saw after frenectomy. Here are some pictures to further ‘quantify’ the results. Remember our dentist said that 30-60% of laser frenectomies will re-attach. Still, the results are visible.
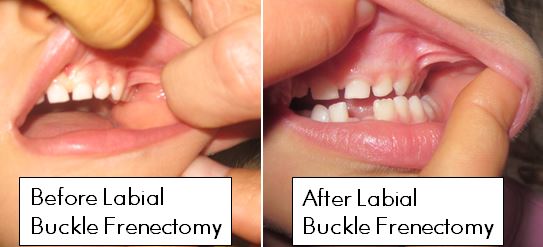
Note that before the labial buckle frenectomy the skin attaches right between the teeth. In the rightmost picture after frenectomy, the skin attaches way above the teeth. This result was after only 1 labial buckle frenectomy. She is going back this month for a ‘revision’ or second pass on this labial buckle. Stay tuned for more pictures.
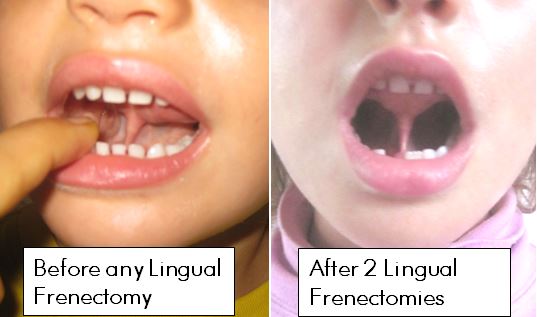
The above pictures compare before and after lingual frenectomies on the 4-6 year old. In both pictures she is suctioning her tongue to the roof of her mouth and then opening it. Notice in the right-most picture the teeth are further apart and the mouth is open wider.
Frenectomy Procedure Pictures – Warning: Graphic Content
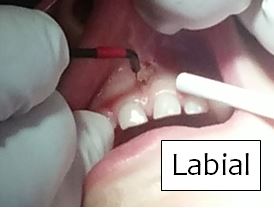
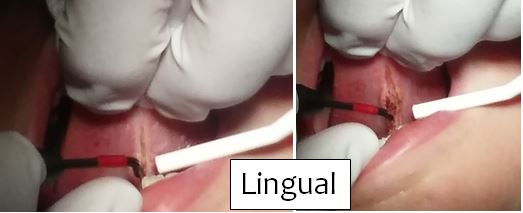
Frenectomies are gruesome. There is no better word. The smell is even worse… Take a fan with the ozonator, if you can! The frenectomy procedure takes about 2 minutes for the labial and about 5 minutes for the lingual (assuming a dentist using a laser). Not a lot of time, but trust me, it will be sore. Here are a few pictures from our latest frenectomies:
Post Frenectomy Pictures – Warning: Graphic Content
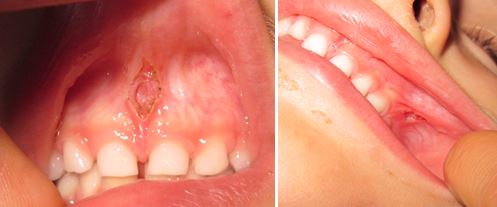
Doing exercises after frenectomies is as painful as it looks. What I find amazing is how much of the frenulum re-attaches in the healing process. It looks like there is no more frenulum at all after surgery. Ok, on to the gruesome, graphic pictures.
The first two pictures were taken almost immediately after surgery. The far right picture was taken a few days after the lingual frenectomy. The tan or whitish spot in the middle of the mouth is what post-frenectomy healing looks like.
Here are some labial and labial buckle post-op pictures.
FAQ
No questions yet, ask away!
References
[1] Daniel Lopez DO, “Adult Frenectomy For Pain Relief: Osteopathic Considerations,” June 2014.
[2] Ben Lynch ND, “The Intersection of Tongue Tie & MTHFR,” 2014.
[3] Defabianis P. (2000) Ankyloglossia and its influence on maxillary and mandibular development. (A seven year follow-up case report). Funct Orthod. 17(4):25-33.
Was this information useful? If so, please consider donating to keep this site alive.
Last Updated:

